在了解模块化、组件化之前,最好先了解一下什么是高内聚,低耦合。它能更好的帮助你理解模块化、组件化。
# 高内聚,低耦合
高内聚,低耦合是软件工程中的概念,它是判断代码好坏的一个重要指标。高内聚,就是指一个函数尽量只做一件事。低耦合,就是两个模块之间的关联程度低。
仅看文字可能不太好理解,下面来看一个简单的示例。
// math.js
export function add(a, b) {
    return a + b
}

export function mul(a, b) {
    return a * b
}
// test.js
import { add, mul } from 'math'
add(1, 2)
mul(1, 2)
mul(add(1, 2), add(1, 2))
上面的 math.js 就是高内聚,低耦合的典型示例。add()、mul() 一个函数只做一件事,它们之间也没有直接联系。如果要将这两个函数联系在一起,也只能通过传参和返回值来实现。
既然有好的示例,那就有坏的示例,下面再看一个不好的示例。
// 母公司
class Parent {
    getProfit(...subs) {
        let profit = 0
        subs.forEach(sub => {
            profit += sub.revenue - sub.cost
        })

        return profit
    }
}

// 子公司
class Sub {
    constructor(revenue, cost) {
        this.revenue = revenue
        this.cost = cost
    }
}

const p = new Parent()
const s1 = new Sub(100, 10)
const s2 = new Sub(200, 150)
console.log(p.getProfit(s1, s2)) // 140
上面的代码是一个不太好的示例,因为母公司在计算利润时,直接操作了子公司的数据。更好的做法是,子公司直接将利润返回给母公司,然后母公司做一个汇总。
class Parent {
    getProfit(...subs) {
        let profit = 0
        subs.forEach(sub => {
            profit += sub.getProfit()
        })

        return profit
    }
}

class Sub {
    constructor(revenue, cost) {
        this.revenue = revenue
        this.cost = cost
    }

    getProfit() {
        return this.revenue - this.cost
    }
}

const p = new Parent()
const s1 = new Sub(100, 10)
const s2 = new Sub(200, 150)
console.log(p.getProfit(s1, s2)) // 140
这样改就好多了,子公司增加了一个 getProfit() 方法,母公司在做汇总时直接调用这个方法。
# 高内聚,低耦合在业务场景中的运用
理想很美好,现实很残酷。刚才的示例是高内聚、低耦合比较经典的例子。但在业务场景中写代码不可能做到这么完美,很多时候会出现一个函数要处理多个逻辑的情况。
举个例子,用户注册。一般注册会在按钮上绑定一个点击事件回调函数 register(),用于处理注册逻辑。
function register(data) {
    // 1. 验证用户数据是否合法
    /**
    * 验证账号
    * 验证密码
    * 验证短信验证码
    * 验证身份证
    * 验证邮箱
    */
    // 省略一大堆串 if 判断语句...

    // 2. 如果用户上传了头像,则将用户头像转成 base64 码保存
    /**
    * 新建 FileReader 对象
    * 将图片转换成 base64 码
    */
    // 省略转换代码...

    // 3. 调用注册接口
    // 省略注册代码...
}
这个示例属于很常见的需求,点击一个按钮处理多个逻辑。从代码中也可以发现,这样写的结果就是三个功能耦合在一起。
按照高内聚、低耦合的要求,一个函数应该尽量只做一件事。所以我们可以将函数中的另外两个功能:验证和转换单独提取出来,封装成一个函数。
function register(data) {
    // 1. 验证用户数据是否合法
    verifyUserData()

    // 2. 如果用户上传了头像,则将用户头像转成 base64 码保存
    toBase64()

    // 3. 调用注册接口
    // 省略注册代码...
}

function verifyUserData() {
    /**
    * 验证账号
    * 验证密码
    * 验证短信验证码
    * 验证身份证
    * 验证邮箱
    */
    // 省略一大堆串 if 判断语句...
}

function toBase64() {
    /**
    * 新建 FileReader 对象
    * 将图片转换成 base64 码
    */
    // 省略转换代码...
}
这样修改以后,就比较符合高内聚、低耦合的要求了。以后即使要修改或移除、新增功能,也非常方便。
# 模块化、组件化
# 模块化
模块化,就是把一个个文件看成一个模块,它们之间作用域相互隔离,互不干扰。一个模块就是一个功能,它们可以被多次复用。另外,模块化的设计也体现了分治的思想。什么是分治?维基百科 (opens new window)的定义如下:
字面上的解释是“分而治之”,就是把一个复杂的问题分成两个或更多的相同或相似的子问题,直到最后子问题可以简单的直接求解,原问题的解即子问题的解的合并。
从前端方面来看,单独的 JavaScript 文件、CSS 文件都算是一个模块。
例如一个 math.js 文件,它就是一个数学模块,包含了和数学运算相关的函数:
// math.js
export function add(a, b) {
    return a + b
}

export function mul(a, b) {
    return a * b
}

export function abs() { ... }
...
一个 button.css 文件,包含了按钮相关的样式:
/* 按钮样式 */
button {
    ...
}
# 组件化
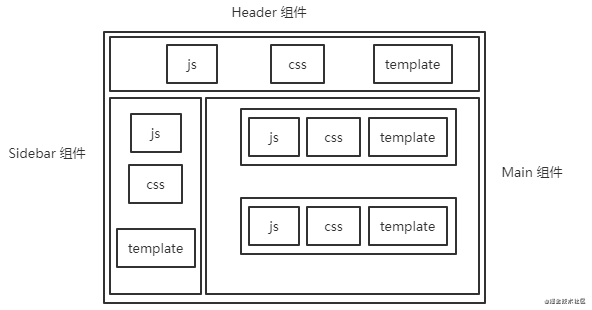
那什么是组件化呢?我们可以认为组件就是页面里的 UI 组件,一个页面可以由很多组件构成。例如一个后台管理系统页面,可能包含了 Header、Sidebar、Main 等各种组件。
一个组件又包含了 template(html)、script、style 三部分,其中 script、style 可以由一个或多个模块组成。

从上图可以看到,一个页面可以分解成一个个组件,每个组件又可以分解成一个个模块,充分体现了分治的思想(如果忘了分治的定义,请回头再看一遍)。
由此可见,页面成为了一个容器,组件是这个容器的基本元素。组件与组件之间可以自由切换、多次复用,修改页面只需修改对应的组件即可,大大的提升了开发效率。
最理想的情况就是一个页面元素全部由组件构成,这样前端只需要写一些交互逻辑代码。虽然这种情况很难完全实现,但我们要尽量往这个方向上去做,争取实现全面组件化。
# Web Components
得益于技术的发展,目前三大框架在构建工具(例如 webpack、vite...)的配合下都可以很好的实现组件化。例如 Vue,使用 *.vue 文件就可以把 template、script、style 写在一起,一个 *.vue 文件就是一个组件。
<template>
    <div>
        {{ msg }}
    </div>
</template>

<script>
export default {
    data() {
        return {
            msg: 'Hello World!'
        }
    }
}
</script>

<style>
body {
    font-size: 14px;
}
</style>
如果不使用框架和构建工具,还能实现组件化吗?
答案是可以的,组件化是前端未来的发展方向,Web Components (opens new window) 就是浏览器原生支持的组件化标准。使用 Web Components API,浏览器可以在不引入第三方代码的情况下实现组件化。
# 实战
现在我们来创建一个 Web Components 按钮组件,点击它将会弹出一个消息 Hello World!。点击这 (opens new window)可以看到 DEMO 效果。
# Custom elements(自定义元素)
浏览器提供了一个 customElements.define() 方法,允许我们定义一个自定义元素和它的行为,然后在页面中使用。
class CustomButton extends HTMLElement {
    constructor() {
        // 必须首先调用 super方法
        super()

        // 元素的功能代码写在这里
        const templateContent = document.getElementById('custom-button').content
        const shadowRoot = this.attachShadow({ mode: 'open' })

        shadowRoot.appendChild(templateContent.cloneNode(true))

        shadowRoot.querySelector('button').onclick = () => {
            alert('Hello World!')
        }
    }

    connectedCallback() {
        console.log('connected')
    }
}

customElements.define('custom-button', CustomButton)
上面的代码使用 customElements.define() 方法注册了一个新的元素,并向其传递了元素的名称 custom-button、指定元素功能的类 CustomButton。然后我们可以在页面中这样使用:
<custom-button></custom-button>
这个自定义元素继承自 HTMLElement(HTMLElement 接口表示所有的 HTML 元素),表明这个自定义元素具有 HTML 元素的特性。
# 使用 <template> 设置自定义元素内容
<template id="custom-button">
    <button>自定义按钮</button>
    <style>
        button {
            display: inline-block;
            line-height: 1;
            white-space: nowrap;
            cursor: pointer;
            text-align: center;
            box-sizing: border-box;
            outline: none;
            margin: 0;
            transition: .1s;
            font-weight: 500;
            padding: 12px 20px;
            font-size: 14px;
            border-radius: 4px;
            color: #fff;
            background-color: #409eff;
            border-color: #409eff;
            border: 0;
        }

        button:active {
            background: #3a8ee6;
            border-color: #3a8ee6;
            color: #fff;
        }
      </style>
</template>
从上面的代码可以发现,我们为这个自定义元素设置了内容 <button>自定义按钮</button> 以及样式,样式放在 <style> 标签里。可以说 <template> 其实就是一个 HTML 模板。
# Shadow DOM(影子DOM)
设置了自定义元素的名称、内容以及样式,现在就差最后一步了:将内容、样式挂载到自定义元素上。
// 元素的功能代码写在这里
const templateContent = document.getElementById('custom-button').content
const shadowRoot = this.attachShadow({ mode: 'open' })

shadowRoot.appendChild(templateContent.cloneNode(true))

shadowRoot.querySelector('button').onclick = () => {
    alert('Hello World!')
}
元素的功能代码中有一个 attachShadow() 方法,它的作用是将影子 DOM 挂到自定义元素上。DOM 我们知道是什么意思,就是指页面元素。那“影子”是什么意思呢?“影子”的意思就是附加到自定义元素上的 DOM 功能是私有的,不会与页面其他元素发生冲突。
attachShadow() 方法还有一个参数 mode,它有两个值:
open代表可以从外部访问影子 DOM。closed代表不可以从外部访问影子 DOM。
// open,返回 shadowRoot
document.querySelector('custom-button').shadowRoot
// closed,返回 null
document.querySelector('custom-button').shadowRoot
# 生命周期
自定义元素有四个生命周期:
connectedCallback: 当自定义元素第一次被连接到文档 DOM 时被调用。disconnectedCallback: 当自定义元素与文档 DOM 断开连接时被调用。adoptedCallback: 当自定义元素被移动到新文档时被调用。attributeChangedCallback: 当自定义元素的一个属性被增加、移除或更改时被调用。
生命周期在触发时会自动调用对应的回调函数,例如本次示例中就设置了 connectedCallback() 钩子。
最后附上完整代码:
<!DOCTYPE html>
<html>
<head>
    <meta charset="utf-8">
    <title>Web Components</title>
</head>
<body>
    <custom-button></custom-button>

    <template id="custom-button">
        <button>自定义按钮</button>
        <style>
            button {
                display: inline-block;
                line-height: 1;
                white-space: nowrap;
                cursor: pointer;
                text-align: center;
                box-sizing: border-box;
                outline: none;
                margin: 0;
                transition: .1s;
                font-weight: 500;
                padding: 12px 20px;
                font-size: 14px;
                border-radius: 4px;
                color: #fff;
                background-color: #409eff;
                border-color: #409eff;
                border: 0;
            }

            button:active {
                background: #3a8ee6;
                border-color: #3a8ee6;
                color: #fff;
            }
          </style>
    </template>

    <script>
        class CustomButton extends HTMLElement {
            constructor() {
                // 必须首先调用 super方法
                super()

                // 元素的功能代码写在这里
                const templateContent = document.getElementById('custom-button').content
                const shadowRoot = this.attachShadow({ mode: 'open' })

                shadowRoot.appendChild(templateContent.cloneNode(true))

                shadowRoot.querySelector('button').onclick = () => {
                    alert('Hello World!')
                }
            }

            connectedCallback() {
                console.log('connected')
            }
        }

        customElements.define('custom-button', CustomButton)
    </script>
</body>
</html>
# 小结
用过 Vue 的同学可能会发现,Web Components 标准和 Vue 非常像。我估计 Vue 在设计时有参考过 Web Components(个人猜想,未考证)。
如果你想了解更多 Web Components 的信息,请参考 MDN 文档 (opens new window)。